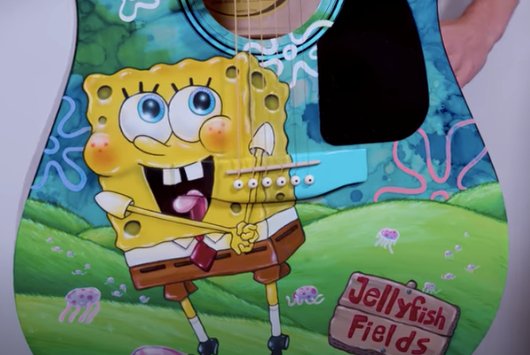
Anyone who can answer the question 'Who lives in a pineapple under the sea' is sure to love this tutorial for creating a custom Spongebob guitar. With the right tools and the following steps you can turn any guitar into a display piece. Follow along as Tommy from @beargallery shows us how to turn a guitar into a piece of art that would be at home in Bikini Bottom.
First, gather the materials you'll need:
Angeuls 9"x11" Multi-Purpose Wet Sandpaper
Premium Masking Tape
Angelus Detail Knife
Angelus Leather Dye
Neutral Leather Dye
Angelus Paint Brush Set
Green, Joker Green, Avocado, Mist, Gamma Blue and White Angelus Paint
Angelus Leather Preparer and Deglazer
1. Prep:
The first step is to remove the guitar strings so they're out of the way while the guitar is being painted.

Then use Premium Masking Tape to cover any areas of the guitar you don't want painted, like the pickguard. An Angelus Detail Knife can be used to cut off excess tape and create clean lines.
Once the strings are removed and the guitar is taped use Angeuls 9"x11" Multi-Purpose Wet Sandpaper to prepare the surface by removing the existing finish. Start with a rough, high grit sandpaper, like 400 and work down to a finer grit sandpaper, like 1500 to create a smooth surface. When you're done sanding wipe off the area with a damp paper towel to remove any dust.
2. Placing the Stencil and Sketching

Tommy uses a stencil of Spongebob on the body of the guitar so he can start planning his artwork around it.

Starting with the background, Tommy uses Angelus Leather Dye to paint the top part of the guitar sky blue. Neutral Leather Dye is used to dilute the dye and help control how dark the dye is.
3. Painting the Grass

Green, Joker Green, Avocado, Mist and White Angelus Paint are used to create the grass on the bottom of the guitar. The White Angelus Paint is used as a primer, followed by blended coats of green paint.
4. Painting the Sign, Jellyfish and Flowers

Once the grass is finished some jellyfish and a Jellyfish Fields sign can be painted. When painting text try starting with the center letters to help create the right spacing. Flowers are also added to the sky.
5. Painting Spongebob
Now it's time to remove the Spongebob stencil. Before painting the bridge is taped off and airbrushed with Mist Angelus Paint. The area of the bridge not under the Spongebob stencil is painted Gamma Blue.

A new stencil can now be added and outlined to help a template while painting Spongebob.
6. Clean up and Finish Coats
With Spongebob painted tape can be removed and the edges can be cleaned up with a Q-tip and Angelus Leather Preparer and Deglazer. A spray on finishing coat is applied to protect the stain, then a brush on water base polyurethane coat can be used to finish it.

With all the finishing coats dried the strings can be put back on the guitar and you have a custom guitar even Squidward would approve of.
More Custom Tutorials
If you want to see more custom tutorials like this one, make sure to subscribe to the Angelus YouTube channel to learn tips and techniques.
Also, make sure to follow Angelus on Instagram and check out our online store to grab the materials you need to recreate this custom Spongebob guitar!

